A Roof Repair
My roof repair story begins 15 years ago. In November of 1997 we signed a contract for a lovely foursquare farmhouse. After two months and about 50 houses we had found our match, but no house is perfect, and right from the beginning I knew there were some things I wanted to change.
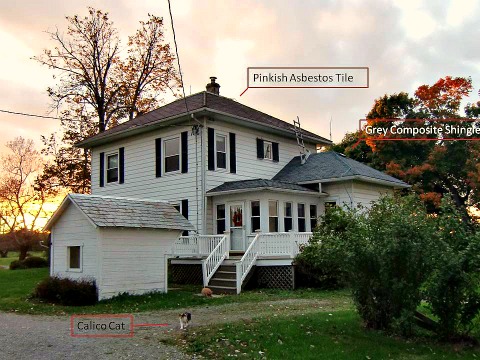
First, the kitchen was awful. It wasn’t just dated, it was bad for any era. Second, the house had one bathroom. Third, there was some seriously worn carpet in that house. Finally, the main part of the house had this 100 year old, pinkish tile that would probably last another 100 years, but the kitchen addition had a dark gray asphalt shingle. That color mismatch bugged me.

All of these are stories of their own. The first three we took care of in the first few years. The roof repair took a bit longer.
The problem was that the asphalt shingles were almost new. There was no way that I was going to pay for a new roof when the old one was still good. I had just paid for a new roof for the house I had sold and didn’t have a big enough wallet to do that a second time. So, here it is 15 years later and I have just now finished that project.
In this article I am going to cover the actual roof repair. but I am also going to talk about my two year search for a matching tile. This will give me a chance to talk about roof tiles in general, while I deal with the problems of matching color. I will do this over several pages.
You can go to the various pages by clicking on the links as they appear or when they show up at the bottom of the page, but here is quick table of contents.
- My Roof Repair Project (This Page)
- My DIY Roofing Project Continued
- Roof Underlayment - In which I discuss an access problem with part of my roof
- Flexible Flashing - in which I discuss a product I used to over come a particular problem
- My Ridge Vent - I add a ridge vent to my roof
You will notice from my before and after pics that I was fairly successful. The shingle that I ended up with was a composite fiberglass shingle. I also added a ridge vent, but I left the old metal vent in place.
What I started with was a roof that was rapidly deteriorating. It was not leaking, but that was going to change if I held off much longer. It is a hipped roof with three sides, and the side that face South-by-South-East gets the most sun and was in the worst shape. Here the shingles were not only curling, but some of them were breaking off.

It had achieved this sad state because for two years I dithered as I searched desperately for a roof option that would match the pink asbestos tile on the main part of the house.
Having finally settled on what roof I wanted to install, I had to do some basic planning in advance of the actual work. I had to have an idea of how much shingle to order, so I wouldn’t run out and run the risk of having to use shingles from different lots that might not match.
Calculating how much roof shingle or tile you need is fairly easy. You simply measure the roof to find out the area of the roof. Then you have to add a little for cutting loss. By cutting loss I mean the fact that any shingles that join at the hips or come to the edge of a gable will have to be trimmed. In most cases all or part of that trim is unusable elsewhere. You also have to add an extra row on the bottom for the starter course. How much loss you will have will depend on how many shingles have to be trimmed. A roof on a simple, long house will have a smaller proportion of such shingles than a house with a complex assembly of roofs. In my case I could count the number of edge shingles on the existing roof to come up with an accurate number. What I wasn’t sure of was how many shingles I would mess up from my lack of experience.
I had some experience. I had helped my father roof our house when I was a teenager. He had done most of the cutting and the cursing, while I offered a strong back and surefootedness to make his job easier. That gave me enough experience to know that this wasn’t that difficult a job once you got around the difficulties of slope and heat.
Anyway, based on my calculations I would need six squares. A square is the amount of shingles that covers 100 square feet. That is a lot of shingles. Depending upon the type of shingles it can weigh several hundred pounds. Usually the shingles are packaged into bundles. which are designed to weigh no more than what one man could carry. For the shingles I chose it took three bundles to make up a square, and each weighed about 75 pounds.
By the way, it may be that your average roofer would have no problem carrying a bundle, but for me, at age 50, and not used to walking on a slope, this was too many. I usually carried seven or eight shingles at a time. Once you break the bundle paper the shingles want to go their own way, so it became difficult to carry a lot at one time. Eight was about my limit without risking losing control of my load.
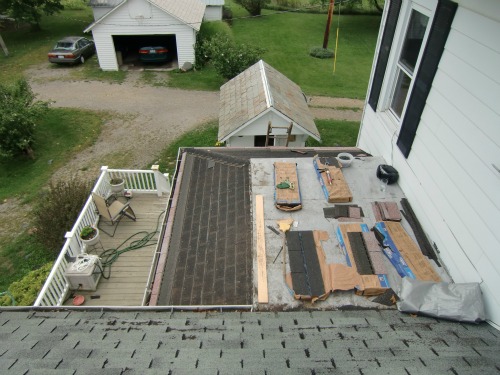
In my particular situation I was doing a hipped roof over a kitchen addition and shingling an eave that flanked a flat roof over my enclosed back porch. The flat roof made a great staging and work area. Most DIY roofing projects aren’t so conveniently arranged.
The shingles I used were the traditional three-tab shingles by Certainteed. I go into my reasons for choosing this shingle in my article on matching shingles.
I tackled the eave roof first. It was smaller, less of a drop if I fell and a little less visible since it had a shallower slope. I figure I wanted to gain experience on a surface that was less likely to show my mistakes.

A view from above showing the tiles staged on the flat roof. The tabs have been cut away on that roof, and the starter and first courses have been laid down.
As much as possible I simply followed the directions on the bundles. For either roof part of the roof butted up against a wall. This was going to be my starting place. From there I would work my way over to where the roof planes met at the hip ridge.
If your roof repair project involves replacing an existing composite shingle roof you have a choice: strip the roof down to the wood (or sheathing) and start over, or build up another layer of shingles. Most roofs can take three layers of shingle. After that the weight becomes a concern and the roof structure may not hold up under the load.
Stripping a roof down to the wood is probably the better choice. Asphalt shingles will hold heat. The more shingle on your roof the more heat that is held. Consider my six squares of shingles. That is a little over 1300 lbs of weight on my roof holding heat. A second layer adds another 1300 lbs. This isn’t quite true because shingles lose weight over time, so the old layers might only weigh 1100 lbs ( I am guessing the weight loss). All this extra mass holds heat, so in the summer time it takes longer to cool down at night. Of course, in the winter it helps heat the attic a little longer. This extra heat will also shorten the life of your shingles. I don’t think it will reduce it by much, but it may void any warranty on the shingles.
However, I chose to build up another layer. I had a few reasons. For one, if I stripped it down I would have to replace the roofing felt at added cost. If my roof had been leaking I probably would have done this, but my roof did not leak, so I wasn’t adding any protection by replacing the felt.
I was also only adding a second layer, not a third. The roof had been stripped down during the last roof repair.
I also reasoned that if I stripped it down, I was going to have to work very hard and very fast and get the roof covered as soon as possible. Since I preferred to do this on my own after work it made sense to not strip it down, leaving it exposed. This made it a more leisurely project with less stress.

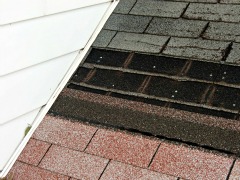
However, my shingles were already curling. If I laid new shingles over the old the curled shingles would create a rough, uneven surface. My solution was to cut off the tabs of the shingles, at least on the surfaces with Southern and Eastern exposures. This added to my work and cleanup, but it also cut down on the weight of the original layer, mitigating some of the concerns with adding another layer. Some of the directions I give in the page that follows are specific to reroofing on top of an existing layer. Some are common to all roofing. I cannot claim to be an expert. I am just relating what I did on my DIY roofing project.
Here is a little safety tip for those roof repair projects where you are adding a new layer over a well-worn roof. Keep the roof free of loose grit and tile pieces. A good sweeping after cutting away tabs will help you to keep your feet.......
.....This article is continued on another page. Click here to continue.
To Continuation Page - My DIY Roofing
To My Roof Underlayment Problem
Please!


New! Comments
Have your say about what you just read! Leave me a comment in the box below.